If you don’t subscribe to DCAC’s Newsletter, DCAC recently moved our website from App Service for Windows to App Service for Linux in Azure. As part of our move to Linux, we moved to the Azure WordPress on App Service feature so that we could take advantage of the WordPress-specific improvements that Microsoft had made for the WordPress for App Service feature.
One of the things we had to do manually, which we could do in Windows, was set up a Disaster Recovery configuration between two App Services. In the Windows world, we had extensions, one of which could replicate file changes from one app service to another. We don’t have that option in Linux, so we had to figure out how to set this replication up.
The solution that we came up with involved using Microsoft DevOps (this can be done with GitHub as well or other source control options, but we decided that Microsoft products tend to integrate with other Microsoft products better than third-party products do, so we went all Microsoft here).
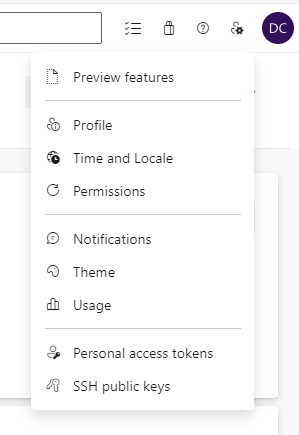
The first thing that was needed was to set up a Personal Access Token (PAT) though the DevOps website for the project that is in question. This requires opening your browser and going to your companies DevOps site and navigating to the project which you’ll use to hold your WordPress files. Once you’ve done this click on the gear icon in the upper right next to your account logo (shown as my initials in the picture).
Once the menu is up, select “Personal access tokens” at the bottom of the menu. On the page that opens, click the New Token button at the top right of the screen.
Give the token a name, select your organization, and how long you want the token to be valid for. For the permissions, you’ll need “Read & write” access to the code. I also have Read access to Packaging as well, but I’m not sure if that right is actually needed or not. Once the permissions are saved, you’ll be given your PAT. Copy this and save it somewhere as it won’t be shown to you again.
At this point, take all your WordPress files and upload them into a repro in this project. This can be done in a variety of ways, so I’ll leave how to get the WordPress files into DevOps to you (I use Git GUI personally).
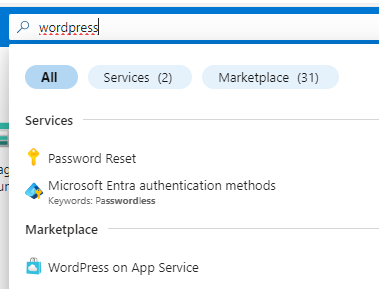
Now you can deploy WordPress on App Service by searching for WordPress in the Azure portal and selecting “WordPress on App Service.” Once you have gone through the wizard and everything has been deployed, we can start making changes to the app service.

In order to make the needed changes, we need to SSH into our app service. Microsoft gives us this ability using webssh which you’ll find in the Azure portal. Open the app service, scroll down in the menu to the “Development Tools” section, and select “SSH” (do not use Bash in the “Advanced Tools” section.
This will give you a web browser, which will prompt you to enter a command prompt into a web server. The server’s default will be/var/www/html. The first thing that we need to do is sync the web server folder with DevOps. The easiest way to do that is to delete the existing website and then create an empty folder. That’s done with some basic code, which is shown below. Before you run the code below, backup the wp-config.php file that Microsoft gives you, and then copy that file back after you are done with this step and the next step.
cd /home/site
rm -rf /home/site/wwwroot
mkdir wwwroot
cd /home/site/wwwroot
We now have an empty folder that the website is pointing to at /home/site/wwwroot. Our next step is to tell the git command who you are and how to log in to DevOps (again, this can be any source control that supports git). Just change {email} to your email address and {name} to your name. Paste this into the command window that you have via the web browser (you need to right-click and paste; ctrl+V doesn’t work). Everything that we are going to be doing will be in this command window.
git config --global user.email "{email}"
git config --global user.name "{name}"
Next, we need to tell git that we are going to use a PAT to connect using the code below. Where is says {PAT} put in the PAT that you got from the DevOps website earlier. There are no quotes or anything needed after the equal sign. Where it says {DevOps Repo}, that’s going to be the URL for the Repo. That will look something like dev.azure.com/{Org}/{Project}/_git/{Repo}”
MY_PAT={PAT}
HEADER_VALUE=$(printf "Authorization: Basic :%s" "$MY_PAT" | base64)
export HEADER_VALUE
git --config-env=http.extraheader=HEADER_VALUE clone "https://$MY_PAT@{DevOps Repo}" -b main /home/site/wwwroot
At this point, the app service will download everything in the repo, which consists of the WordPress files. When this is done, copy back the wp-config.php file that you backed up earlier.
Once that is done, we need to tell git that the folder with our WordPress install is safe using this line of code.
git config --global --add safe.directory /home/site/wwwrootThe final command that we need to run to setup our process sets up an alias for our URL that we used above.
git remote add DevOps "https://$MY_PAT@{DevOps Repo}"At this point, the directory for the WordPress files is now in source control, and we can upload changes when we install new plugins or patch WordPress to source control. Since we don’t want to do that manually, we want to set up automation to upload those changes when they happen. This way, we can patch the website or install a new plugin, and it will automatically be sent to our other App Services in other regions.
To do this, edit a file to handle this work. I created mine in /home/dev/, and I called it push.sh. The contents of the script are pretty straightforward. I have mine logging to a text file, so when debugging, I can monitor what’s going on. Even though you might think that the log file will get rather large, it really won’t, as it only logs data when there are changes to the website’s files. You can disable this logging by simply removing everything from the >> and to the right on that same line.
#!/bin/bash

git config --global user.email "{email}"
git config --global user.name "{name}"

echo "$(date) - $HOSTNAME - Starting" >> /home/dev/push_changes_to_devops.log
cd /home/site/wwwroot
while true; do

echo "$(date) - $HOSTNAME - Watching for changes" >> /home/dev/push_changes_to_devops.log
inotifywait -e modify,create,delete -r /home/site/wwwroot

echo "$(date) - $HOSTNAME - Changed detected, sleeping for 5 minutes" >> /home/dev/push_changes_to_devops.log
sleep 5m

echo "$(date) - $HOSTNAME - Marking folder as safe" >>/home/dev/push_changes_to_devops.log
git config --global --add safe.directory /home/site/wwwroot >> /home/dev/push_changes_to_devops.log

echo "$(date) - $HOSTNAME - Adding to git">>/home/dev/push_changes_to_devops.log
git add * >> /home/dev/push_changes_to_devops.log

d=$(date)
echo "$(date) - $HOSTNAME - committing to git">>/home/dev/push_changes_to_devops.log
git commit -a -m "automated commit from website patching $d">> /home/dev/push_changes_to_devops.log

echo "$(date) - $HOSTNAME - pushing to git">>/home/dev/push_changes_to_devops.log
git push DevOps main >> /home/dev/push_changes_to_devops.log

echo "$(date) - $HOSTNAME - sleepting for 15 minutes" >> /home/dev/push_changes_to_devops.log
sleep 15m

done
You’ll notice a couple of sleep commands in this script. The first one at the top will allow whatever plugin change or WordPress upgrade to finish before it checks the change into source control. Without this, you’ll end up with a partial upgrade uploaded to source control, which will probably cause errors on the other servers.
The second sleep command tells the script that after it’s checked in to source control, don’t look for changes for another 15 minutes. This is for my own sanity so that you don’t end up with a flood of check-ins to source control. I wanted to ensure that another change wasn’t checked in before the current change was deployed to the other site.
The last change that we need to make is to tell the App Service to run our script on startup. We do this by editing the /home/dev/startup.sh file. Edit the /home/dev/startup.sh file and add in the following two lines (if the first line of your startup.sh file already contains #!/bin/bash only add in the second line).
#!/bin/bash
/home/dev/push.sh
Once this is saved, you can manually run the push.sh, file, and then view the push_changes_to_devops.log file (I recommend using tail to watch this file in real time). Open another window to the same webssh and edit a file (or install/update a plugin), and you’ll see the change be checked in.
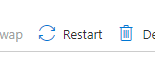
Once you have the script working and testing, navigate to the App Service in the portal and restart the app service using the “Restart” button. This will cause the push.sh script to be run at the container’s startup. You can see that it is running by updating another plugin (or installing a new plugin), and about 6 minutes later, you’ll see that file in your source control.
The config is much easier on the App Service that you’ll be using for your Disaster Recovery site (we haven’t set that one up yet). Go to the Azure portal and select your DR App Service (if needed, create one). In the “Deployment” section, select “Deployment Center.”
On the right, under source, select DevOps (or GitHub or whatever your source control is). Then select the rest of the fields as needed. When done, click Save. We are using DevOps because the automatic deployments just work. When a change from the production site is checked into DevOps, those changes are automatically pushed to our DR site. You can monitor these deployments on the Logs tab.
Hopefully, this will help someone else who’s trying to do the same thing.
Denny