No, not that kind of volume!
Over the past couple of blog posts, I have been talking about the versatility of deploying SQL Server with Docker. This combination is a great way to quickly and easily spin up local SQL Server instances. In the most recent post, I talked about a method to copy and restore a sample database into a Docker container that is running SQL Server. In this post, I am going to talk about an easier way to accomplish this by attaching a persistent volume to the container. With this method you don’t have to copy any files into the container, and it makes the overall process easier and repeatable.
First, before we get into the code, let’s talk about what a volume is. Essentially, a volume is a location on the host machine that can be referenced by the container. I think of this as a shared folder that the container can see. Once attached to the container, it can then read or write to the volume. You can easily declare the volume when you create the container with a simple switch in the command.
Let’s take a look!
Creating a Local Folder
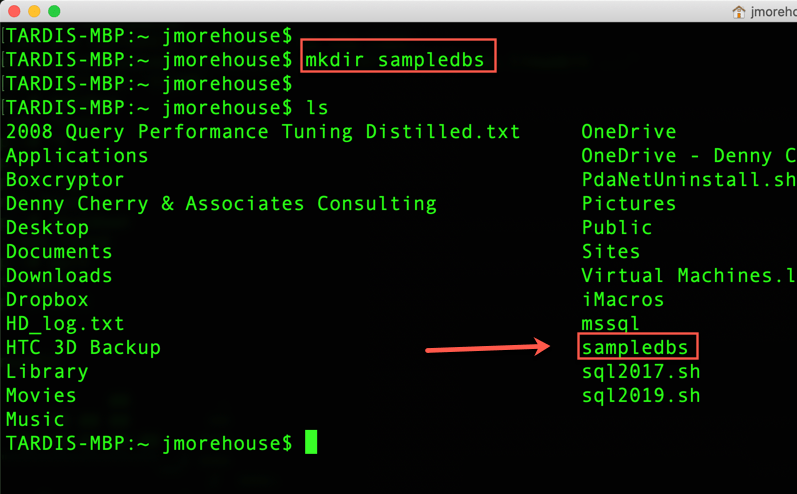
Since I’m going to use a volume to hold backup copies of SQL Server sample databases, I am going to create a new local folder entitled “sampledbs”. Within a terminal session within your local profile, you can issue a “mkdir” command, which stands for “make directory”. MKDIR is also utilized in several various operating systems, including Windows, so it may be familiar to you.
Next, I want to put a copy of the AdventureWorks2017 database backup file into the folder we just created. If you haven’t already, you can down the file from Microsoft’s GitHub repository. In my case, I have it already downloaded. I’ll copy it to the appropriate folder using the the “cp” command, which stands for “copy”.
Shown above, I am in the “mssql” directory that I had in my profile. I issue the copy command to copy the AdventureWorks2017.bak file into the new directory. Then I move to the new samplesdb directory and issue a “list” or “ls” command to show the contents of the directory. We can see that the file now exists in the right directory.
Next, we need to share the folder within Docker and then we can create a container with a volume.
Sharing the Folder in Docker
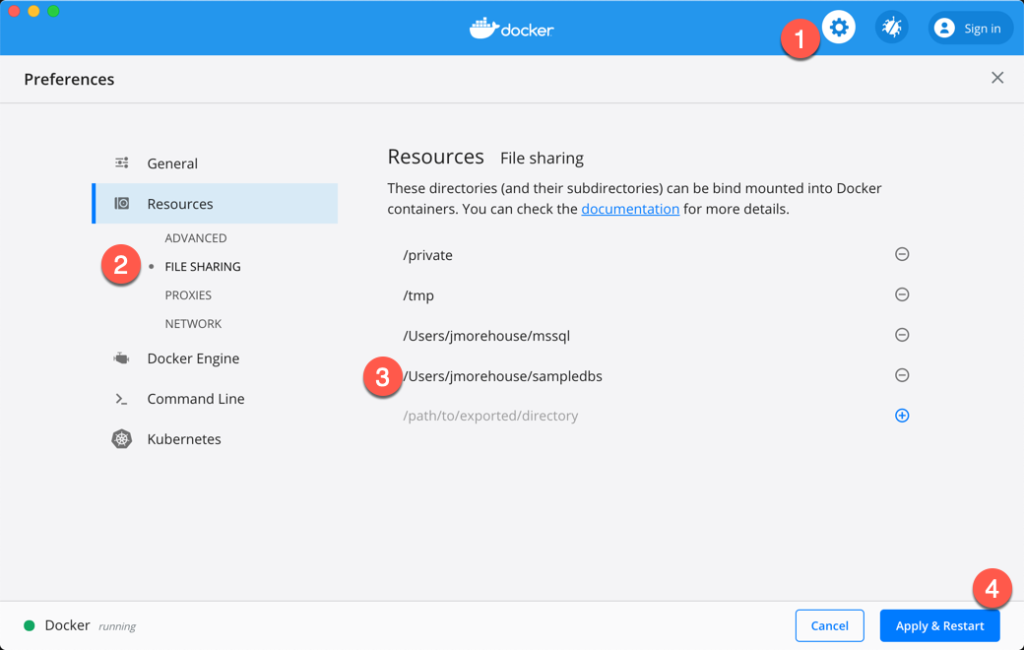
In order for the volume to be mounted to the container, Docker must be granted access to do so. This is done by specifying the folder as “shared”.
Open the Docker Dashboard. This can be done by right clicking the Docker icon (looks like a ship) in the system tray. Select Dashboard.
Once the dashboard has opened, do the following:
- Next, go to the gear icon in the upper right area.
- Then on the left-hand side click expand Resources and then click on File Sharing.
- Click on the plus icon and browse to the folder that you just created in the step above.
- Apply & Restart.
After restarting, the folder is now able to be attached to a container. Now we can create a container with a volume.
Creating a container with a volume
The process is straight forward to create a volume when creating a container. If you recall from previous posts, we create the SQL Server container with this command,
docker run -e 'ACCEPT_EULA=Y' -e 'SA_PASSWORD=yourStrong(!)Password' -p 1433:1433 -d mcr.microsoft.com/mssql/server:2019-latest
If we wanted to add a volume to this container, we would include the “-v” or “-volume” switch. As shown below, the volume switch tells Docker that I want to attach a volume “/Users/jmorehouse/sampledbs”, which was defined in the previous step, to the container. Inside the container, the folder “sampledbs” will be allocated.
docker run -e 'ACCEPT_EULA=Y' -e 'SA_PASSWORD=yourStrong(!)Password' -p 1433:1433 -v /Users/jmorehouse/sampledbsl:/sampledbs -d mcr.microsoft.com/mssql/server:2019-latest
I think of this as a one to one mapping. The volume essentially lives outside the container itself and inside the container it is represented by the folder “sampledbs”. This is done with the context of Local volume location:inside the container location
Now what?
So far we have examined how to create a container with a volume attached. In my previous post, I discussed how to copy a backup file from the host machine into a container. By doing this it allowed me to restore a database within the container but that meant I had to copy a file and duplicate it. By using a volume, I don’t have to copy anything into the container. i can now either issue a command in the container (like a SQLCMD query) to restore it or do it through tools like Azure Data Studio. Let’s take a look at using Azure Data Studio.
First, I’ll start the container with the volume mounted.
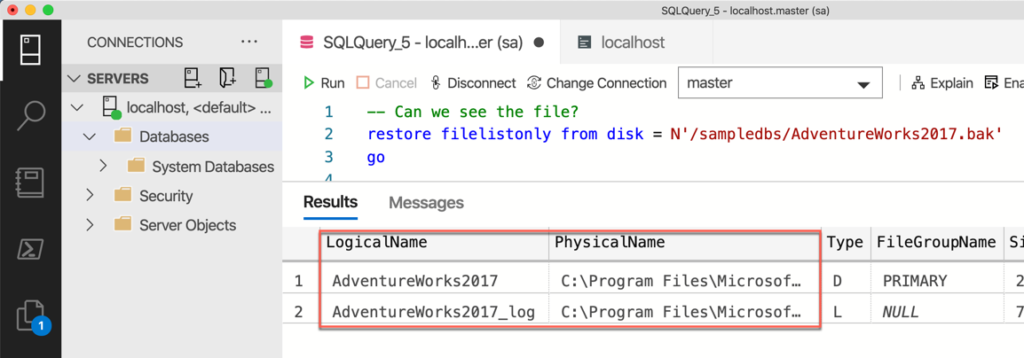
Once the container is up and running, I start Azure Data Studio and being a new query. First, I’m going to see if SQL Server can see the AdventureWorks2017 backup file in the sampledbs folder that was created.
RESTORE FILELISTONLY FROM DISK = N'/sampledbs/AdventureWorks2017.bak'
GO
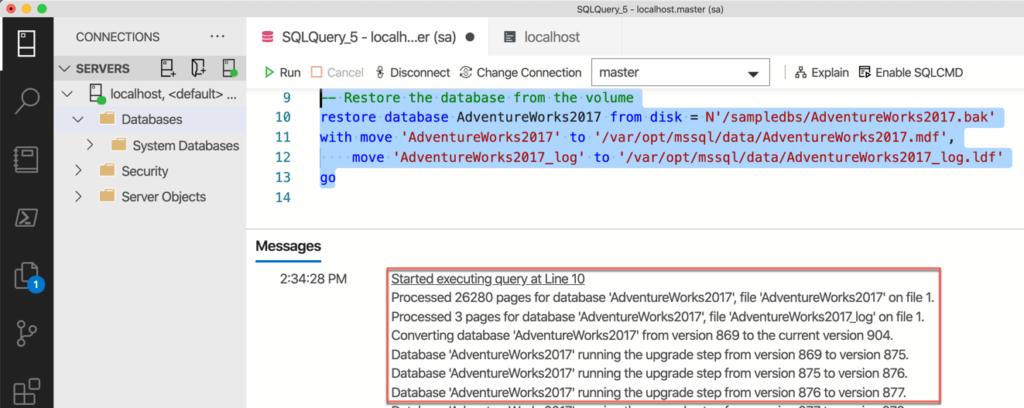
Success! SQL Server can see the file and restore the headers. This means that I can now restore it.
RESTORE DATABSE AdventureWorks2017 FROM DISK=N'/samplesdbs/AdventureWorks2017.bak'
WITH MOVE 'AdventureWorks2017' to '/var/opt/mssql/data/AdventureWorks2017.mdf',
     MOVE 'AdventureWorks2017_log' to '/var/opt/mssql/data/AdventureWorks2017_log.ldf'
GO
Remember, the backup file doesn’t actually exist within the container. It lives in a folder on the host, in this case my Mac laptop, and uses the mapping to reach into the host to obtain the file.
Summary
This was a brief look at using volumes in conjunction with containers. The volume can now be used with other containers which prevents having to manually copy files, such as backup files, into the container. The container itself can now just reach into the volume and do what it needs.


